But I can tell you all about another chapter in My Adventures with Indigo. It's a long one; you might want to make a cup of your favourite beverage now, before you start.
About 12 months ago I ordered both Japanese Indigo and Woad seeds, my cunning plan being to throw cabbages to the wind and grow blue instead. Alas, I have no greenhouse: the bitterly cold winter and late, wet spring put paid to the Japanese Indigo, which even indoors scarcely showed a leaf before giving up the ghost. This isn't the climate it was looking for. Woad, on the other hand, was and still is grown here as a crop, so I expected more of it. To its credit, it delivered. Woad is apparently a gross feeder, in this case meaning that it needs nutrients and lots of them, rather than having no table manners. I fed it regularly with blood, fish and bone, and watered regularly in dry weather. It's biennial; the first year leaves give colour, the second year there is no colour (can't vouch for this yet), but you get seeds to grow more. Harvest the leaves from midsummer on. This post depicts events on July 21, my first pick.
I have both Jenny Dean's Wild Colour (I have an earlier edition) and Rita Buchanan's A Dyer's Garden, both of which give instructions for dying with fresh woad leaves. It's extremely straightforward.
First grow your woad. I suspect it's important to move as quickly as possible from harvest to hot water, so I set up my kit next to the woad, which is the lowish, bright green, elongated leaves to the right of the cabbages. The net is essential: everything under the net

Basic equipment for an afternoon of fun: well-wetted materials to be dyed blue, plus a large container (I used a jar because I can see the colour of the liquid in it), a large wooden spoon, rubber gloves, a glug or two of household ammonia, a BIG saucepan or stockpot (it will hold only water), with trivet and a thermometer accurate from 0–100°C. For further excitement you'll need a saucepan you don't use for food, and 1 tsp of alum mordant. Read the instructions below to make sure you understand what you'll be doing and why.
Fill the kettle (really full) and put it on for tea.
Pick the leaves as quickly as possible, and stuff them into a container. A large glass jar is good because you can see the fluid change colour, which is helpful. No need to shred them finely or anything, I just grabbed handfuls, slugs and all, ripped them in half and stuffed them into that large jar.
The kettle should be boiling by the time you finish: pour the boiling water into the jar, enough to cover the leaves. Make tea with the leftover, if you want any; I opted for squash instead. Leave the leaves to soak.
If you plan to go straight to dyeing once you've got the indigo from the leaves, at this point you should half-fill a saucepan or stockpot large enough to hold your jar with water at least halfway up the sides, put the trivet in the bottom (to prevent the glass jar from overheating on the metal) and put it on low heat (you're aiming for 100-120°F (38-48°C). If you haven't got a trivet, I use a layer of metal table forks.

The jar of leaves soaking in hot water.
The fluid will change from water-clear to dark sherry-brown as the leaves wilt. After an hour, remove the leaves (I used a kitchen strainer), squeezing out every drop of fluid, and put them carefully to one side. You will use them again.

The chemistry of indigo dyeing is not complicated, but it's important. The dark brown fluid in the jar contains indigo from the woad leaves in the form of indoxyl (more detailed info on Wikepedia, scroll down to Extraction). To extract the indigo from the fluid, add a glug (about 1 tablespoon for this jar) of household ammonia to the fluid. Buchanan says baking soda will also work, I haven't tried it.). Now pour the fluid back and forth between two containers, exposing it to the air as much as possible. You want bubbles and lots of them!

The foam starts yellow but turns a beautiful turquoise as the fluid is oxygenated, transforming the indoxyl into insoluble blue indigo. Once it's as blue as blue can be, it's decision time. You can dye with the fluid and indigo, or you can filter out the indigo particles and save them for another day. Filtering takes longer to do but much less time to describe, so I'll show you that first. If you want to DYE NOW! skip the next section.
Filtering the indigo particles
My reading suggested that coffee filters and such aren't fine enough to trap the bulk of the indigo particles. Some people use proper filter paper, but I didn't have any. Instead I used two layers of extremely finely-woven commercial silk fabric to line a small tea strainer. Straining a smaller volume (I did this with the second batch of woad processed in August) took the best part of two days. Save the filtrate (the filtered fluid): it probably still contains enough indigo to dye something else blue if you follow the instructions for dyeing with the fresh indigo solution, below.


I suspect that's very impure; there's probably a lot of vegetable debris as well, but I see no reason for it not to work.
I dyed a skein of cotton with the fluid that ran through the silk. A paler blue, but still blue!


Dyeing with the fresh indigo solution
If you decide to go ahead and dye with the solution, from this point the process is similar to a standard chemical indigo vat. Make a solution of reducing agent (thiourea or Spectralite), 1 tbsp in a jar of warm water and add it to the fluid in the jar. The reducing agent absorbs oxygen in the water, which transforms the insoluble blue indigo particles to the yellowish soluble form. In this form they are absorbed by the materials you want dyed. Now, given that you're trying to REMOVE all the oxygen from the solution, once you've added the reducing agent you should take great care not to ADD oxygen (air!) unnecessarily. Stir gently, don't create bubbles. To activate it, the solution must now be heated to 100-120°F (38-48°C) for about an hour. Check the temperature of your water bath and adjust it by adding boiling water or cold water as needed. Put the jar in. Stir it gently from time to time and check the colour of the fluid. It should become yellowish: with luck you can see that the bottom of the bubbles and the fluid is in fact yellowish.

When it looks like that it's ready to use. Take the jar off the heat if it's more convenient. Squeeze excess water from whatever it is you're dyeing and add it to the jar.

Note the bluish tinge to the merino locks, which still contained some air. A hint of what is to come. I left the fibre and yarns (wool and silk) in the jar for about 15 minutes. When removed from the jar oxygen hits the pale green-yellow liquid: it begins to turn blue. First turquoise, then darkening further.

You can dye more material in the jar until the indigo is exhausted, but remember that each batch adds oxygen. If the fluid becomes more blue than yellow, add more thiourea or Spectralite and repeat the heating process to drive off the excess oxygen, thus reducing the indigo to the soluble yellowish form that dyes.
Different fibres take and hold indigo differently: unlike 'chemical' dyes, in which the dye molecules chemically bond to the material, the soluble yellow indigo penetrates into microscopic cracks and crevices where, with luck, the insoluble blue particles are trapped, wedged firm. Those that aren't trapped firmly will come off on your skin (and everything else) as the indigo blue 'fades' over time. Silk and other very smooth fibres have fewer places to trap indigo, so tend to end up paler than wool or cotton. But when they first come out of the vat, everything is simply glorious blue. In this case, glorious blue FROM LEAVES!!!
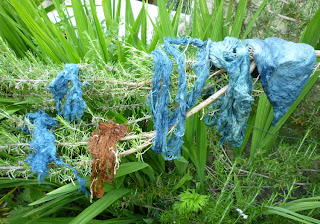
Well, not quite everything. That pinkish-brown skein of silk is just as magical, or even more. Remember I told you to save the leaves strained from the initial solution?
Dyeing with indirubin: Woad 'pink'
If you now treat the woad leaves from which the indigo was extracted as if they were standard fresh plant material, they will yield a totally different colour: woad pink. Mine was more brown than pink, but still absolutely astonishing to get two such different colours from a single leaf. The technique is simple: stir the strained leaves into a pan of water (I used rainwater, in case our very hard water affected the chemistry) and simmer for an hour or so.

Strain off the leaves – this time you can discard them! – and add 1tsp of alum mordant to the dye solution.

Add the material to be dyed and simmer for another 15 minutes or so, then allow the solution to cool with the material in it - leave it overnight if you can - as this yields a deeper colour. Here's a closer view of the silk to show the indirubin colour:


2 comments:
Fascinating! There are always more and more twists to this fiber story, aren't there?
oh dear. One must be dedicated, eh?
But lovely! blue! color!
from leaves!
Post a Comment